How To Investigate Suspected Phishing Emails In 2026
In this article, we'll cover everything you need to know to conduct your own phishing email investigations.
We'll deep-dive into various influencing factors and outline how seemingly innocuous technical and circumstantial details can be indicators of potential phishing attempts. If you're an admin who needs to regularly review reported emails or just a user that just wants to skill up, this article will equip you with much-needed information.
Potential Outcomes Of An Email Investigation
When you investigate an email, there are four potential classifications that can be applied, notably these include:
- Safe: If an email is expected, provides value, and/or contains desirable information for the recipient, it can be marked as safe.
- Spam: If an email is unexpected, unwanted, and doesn't provide meaningful value for the recipient, but it isn't malicious in nature, it can be marked as spam.
- Phishing: If an email attempts to get the recipient to perform an action that is adverse (e.g., perform unauthorized money transfers, etc.) or malicious in nature (e.g., includes links to phishing websites, etc.), it can be marked as phishing.
- Unknown: If an email can not be comfortably classified as safe, spam ,or phishing, then it can be marked as unknown, requiring further clarification.
The goal of an investigation is to ideally mark an email as safe, spam, or phishing, and it's important to remember that the criteria for these classifications are contextual on a user-by-user basis. An email that might be spam for one user could be wanted and safe for another.
7 Steps To Investigate Suspected Phishing Emails
Now that we understand the goal of an email investigation, let’s dive straight into how to perform one. Below, you can follow a structured 7-step investigation process using the interactive wizard to walk through each step. Once complete, it provides a percentage risk score indicating how likely the email is to be a phish, along with practical recommendations on what to do next.
 Phishing Email Analyzer
Step 1 of 7
Step 1: Validate The Sender Address
Check the email headers for SPF, DKIM, and DMARC authentication results.
Did SPF, DKIM, and DMARC all pass?
Step 2: Analyze Sender Infrastructure
Check the sender IP and domain against reputation blocklists.
Is the sender IP or domain listed on any blocklists?
Step 3: Analyze Embedded Links
Examine any links in the email body for suspicious characteristics.
Does the email contain any links?
Are any link domains flagged on reputation blocklists?
Do any links redirect to a different domain than expected?
Does the destination website content match the domain? (e.g., a Microsoft login page on a non-Microsoft domain)
Step 4: Analyze Embedded Attachments
Examine any attachments for potentially dangerous file types or malware.
Does the email contain any attachments?
Is the attachment a potentially dangerous file type? (e.g., .exe, .docm, .js, .vbs, .scr)
Did a malware scanner (e.g., VirusTotal) flag the attachment?
Step 5: Analyze Email Sentiment
Assess the tone, intent, and emotional cues in the email.
Does the email create a sense of urgency, fear, or excitement to pressure you into acting quickly?
Does the email request sensitive actions? (e.g., money transfers, gift cards, updating bank details, sharing credentials)
Step 6: Analyze The Sender & Recipient Relationship
Consider the history and context of the sender-recipient relationship.
Has the sender previously communicated with the recipient (back-and-forth emails over 30+ days)?
Has this sender been reported for spam or phishing by other employees?
Step 7: Analyze Impersonation Signals
Check if the sender is pretending to be someone else.
Does the sender's domain match the expected domain for the organization they claim to represent?
Does the display name or email local-part attempt to mimic a known person or brand?
Analysis Results
Step 1. Validate The Sender Address
The goal of this step is simply to validate that the email address the email appears to come from is authentic.
To do this, you need to delve into email headers and ensure that email authentication checks against SPF, DKIM, and most importantly, DMARC have a “pass” result. A failure against any of these three protocols could be evidence of email spoofing and/or email tampering, bringing into question the authenticity of the sender address.
Depending on the email client in use, the process for validating the sender address is slightly different:
How To Validate The Sender Address In Outlook:
To validate a sender address in Outlook, you need to open the suspected phishing email, click the three dots icon in the top-right sub-menu, click the “View” button, and then click “View message details”.
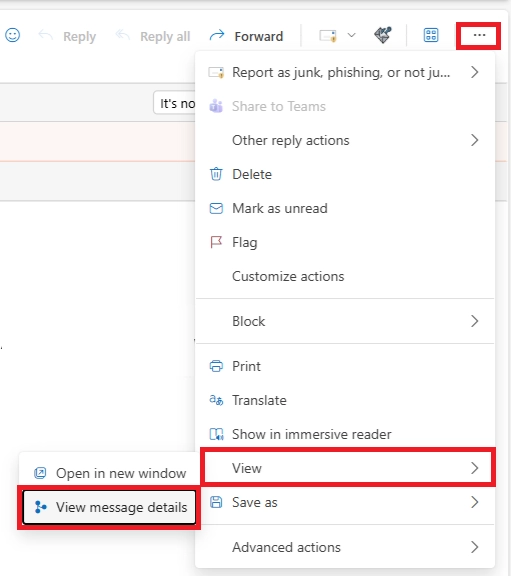
With the message details pop-up open, look for the “Authentication-Results” header. This header is applied by Microsoft on inbound emails, and it states the results of email authentication checks with a clear indication of which checks passed and which failed.

How To Validate The Sender Address In Gmail:
To validate a sender address in Gmail, you need to open the suspected phishing email, click the vertical three dots icon in the top-right sub-menu, and then click the “Show original” button.
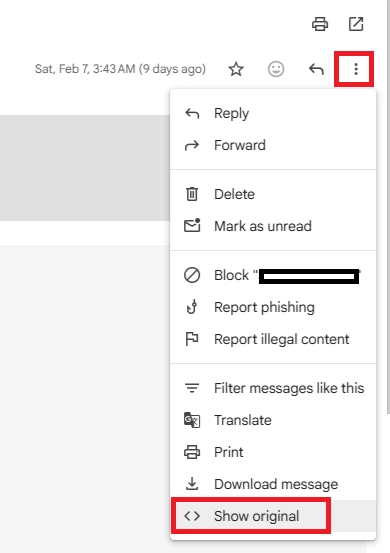
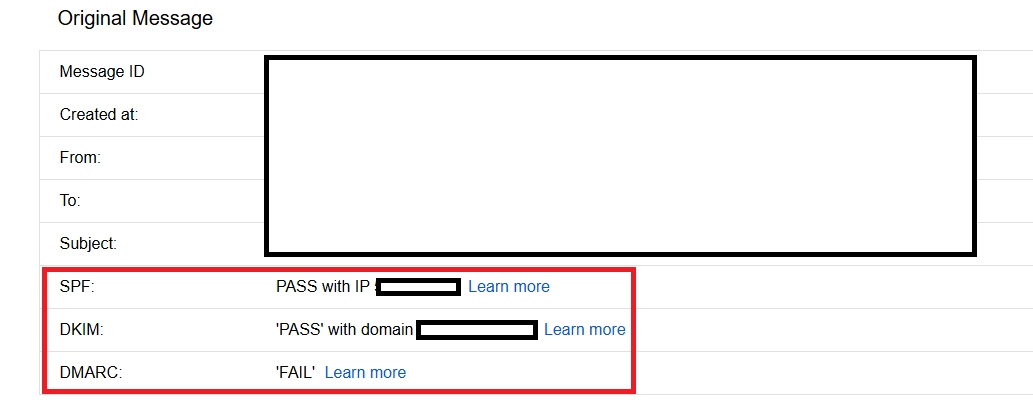
With the original message pop-up open, look for the SPF, DKIM, and DMARC fields. These fields provide a clear indication of which checks passed and which failed.
Step 2. Analyze Sender Infrastructure
The goal of this step is to determine if both the IP address used to send the email and the domain used in the sender address are known to be used for the delivery of spam and/or phishing. The best way to do this is to lookup the sender IP address and domain against IP and domain reputation blocklists. A few good public and free reputation blocklists have been linked below:
- MXToolBox IP & Domain Blocklist Lookup
- Spamhaus IP Address Reputation Lookup
- Spamhaus Domain Reputation Lookup
If any of these blocklists return an adverse result, it may indicate that the email is spam or phishing.
Step 3. Analyze Embedded Links
The goal of this step is to look at any links that are embedded in the email body and determine if the websites they lead to are legitimate or nefarious. In some cases, the actual destination of a link may be hidden behind URL shorteners or other types of URL rewriting technologies.
Similar to analyzing sender infrastructure, it's important to extract the domains that any embedded links lead to, and ensure that a reputation lookup of the domain doesn't return any adverse results.
However, when analyzing embedded links, it's important to take the analysis a step further and discover if any URL redirections are in place. For example, if a link points to one destination and then redirects to another, it could be an attempt to evade reputation-based lookups. To check for this, you can use free redirection checker tools, such as the What's My DNS Redirect Checker.
Another item that's crucially important during this step is to compare the destination website against the content that's actually on that website. For example, if a link points to a Microsoft-themed login page, but an obscure non-Microsoft domain is in use, it can be clear evidence of a phishing email.
Important Note: Because this step requires actual interaction with potential phishing links, it's recommended to only view the destination website in an isolated and temporary sandbox environment.
Step 4. Analyze Embedded Attachments
The goal of this step is to look at any attachments that are embedded in the email body and determine if the attachments are legitimate or malicious.
As an initial step, it's recommended to look at the file type and extension of any attachments. For example, if an email includes a simple text file (.txt) attachment, it's unlikely to be malicious, but if an email includes a Macro-Enabled Word Document (.docm) attachment, it's highly likely to be malicious.
If you suspect the attachment could be malicious, you can then use third-party malware analysis tools such as VirusTotal to analyze the attachment and provide a verdict on whether the attachment is safe or malicious.
Important Note: Never analyze suspicious attachments on your own computer. If you need to open the attachment to determine whether it's safe or malicious, use an isolated, temporary sandbox environment.
Step 5. Analyze Email Sentiment
The goal of this step is to determine what the overall tone and intent of the email is. Is the sender attempting to invoke an emotional response by using urgency, fear, or excitement tactics so the recipient performs an action without fully considering the consequences? If any of this is true, it can also be a sign of a phishing attack.
In the case where an email has no links or attachments, it's particularly important to understand the intent of the email and the action being requested of the recipient. Is the sender asking the recipient to update bank account details, transfer money, buy gift cards, or are they being urged to move off email and switch to phone calls, WhatsApp, or another mode of communication? These, again, can all be signs of a phishing attack.
The goal of this step is to assess the overall tone, intent, and emotional cues present in the email message. Phishing emails often attempt to manipulate recipients by evoking a strong sense of urgency, fear, or excitement, pressuring the reader to act quickly without due consideration.
Step 6. Analyze The Sender & Recipient Relationship
The goal of this step is to understand context, and it's tightly coupled with sentiment. For example, if the sender has an established relationship with the recipient, it may not be that unusual if there's an element of urgency, curtness, or excitement, but if the recipient has never interacted with the sender, these same cues could raise alarm.
Some simple but important steps to understand the sender & recipient relationship are to confirm if any of the following are true:
- Have the sender & recipient ever had a back-and-forth email exchange?
- Has the sender been in prolonged contact with the recipient (ideally dating back at least 30 days)?
- Has the sender been in regular and prolonged contact with any other employees?
- Have any other employees reported this sender for spam or phishing?
- Is this the first time the sender has contacted the recipient?
On their own, the above questions may seem quite innocuous, but when coupled with other circumstantial information, they provide crucial context to distinguish between safe, spam, and phishing emails.
Step 7. Analyze Impersonation Signals
The goal of this step is to understand if the sender is attempting to masquerade as someone else. Notably, a person or organization that the recipient trusts.
There are various ways that a sender can do this, such as through email address spoofing, but it can also be done through a custom local-part email address or a custom display name.
To check for signs of impersonation, you need to verify that the sender's domain matches the expected domain for the organization the sender represents. For example, if the sender has introduced themselves as John Doe from CanIPhish, but the domain of their sender address doesn't match the expected domain of a CanIPhish employee, it's a signal that the sender is attempting to impersonate something that they're not.
Conclusion
Once you've performed all 7 steps, you'll be in a great position to make a determination on whether an email is safe, spam, or phishing. When making this determination, it's important to draw upon disparate pieces of information and connect the dots. For example, an email could still be safe, even if the sender and recipient have never previously communicated, while simultaneously, an email could still be phishing even if the sender and recipient have prolonged two-way communication.
It's on you, as the admin or user, to make an informed decision based on all information available.
Free Email Threat Analyzer
Upload an email. Get an instant threat verdict.
Use our free EML AnalyzerA Security Professional who loves all things related to Cloud and Email Security.